Starting February 15, 2022, we will no longer purchase or eat any food from the grocery store (except salt & baking powder). Instead, we are choosing to experience what it is like to raise and forage for all of our food. This means EVERYTHING: flour, oil, honey, spices, cheese, fruits, nuts - Follow our journey and learn about feeding yourselves

Making cheese at home is not only rewarding, but a great way to save money when grocery prices soar. You can easily turn a gallon and a half of milk into a $30 24-oz block of small batch artisanal cheese.
See our other blog posts about How to make Chevre and also Homemade Mozzarella. If you want to try your hand at hard cheeses, keep reading!
I get asked this a lot. The similarities between these different varieties of cheese are remarkable. They all start with milk. The milk is heated and mixed with a culture, which can be the same variety for different cheeses. After the milk ripens, rennet is added. At some point salt is added, and the curds are pressed.
The nuances of temperature, timing, how much pressure, and whether salt is added to the curd or later in a brine all contribute to differences in flavor. The aging process is another important variable. That's this novice's answer. As you read more about different cheeses, you'll learn many were named after the region where they were created. Perhaps the bacteria present in the cheese caves where cheeses were originally aged contributed to their characteristic flavor. As this point in my cheese making journey, I follow recipes and keep my fingers crossed.
There isn't a lot of special equipment, but you will need
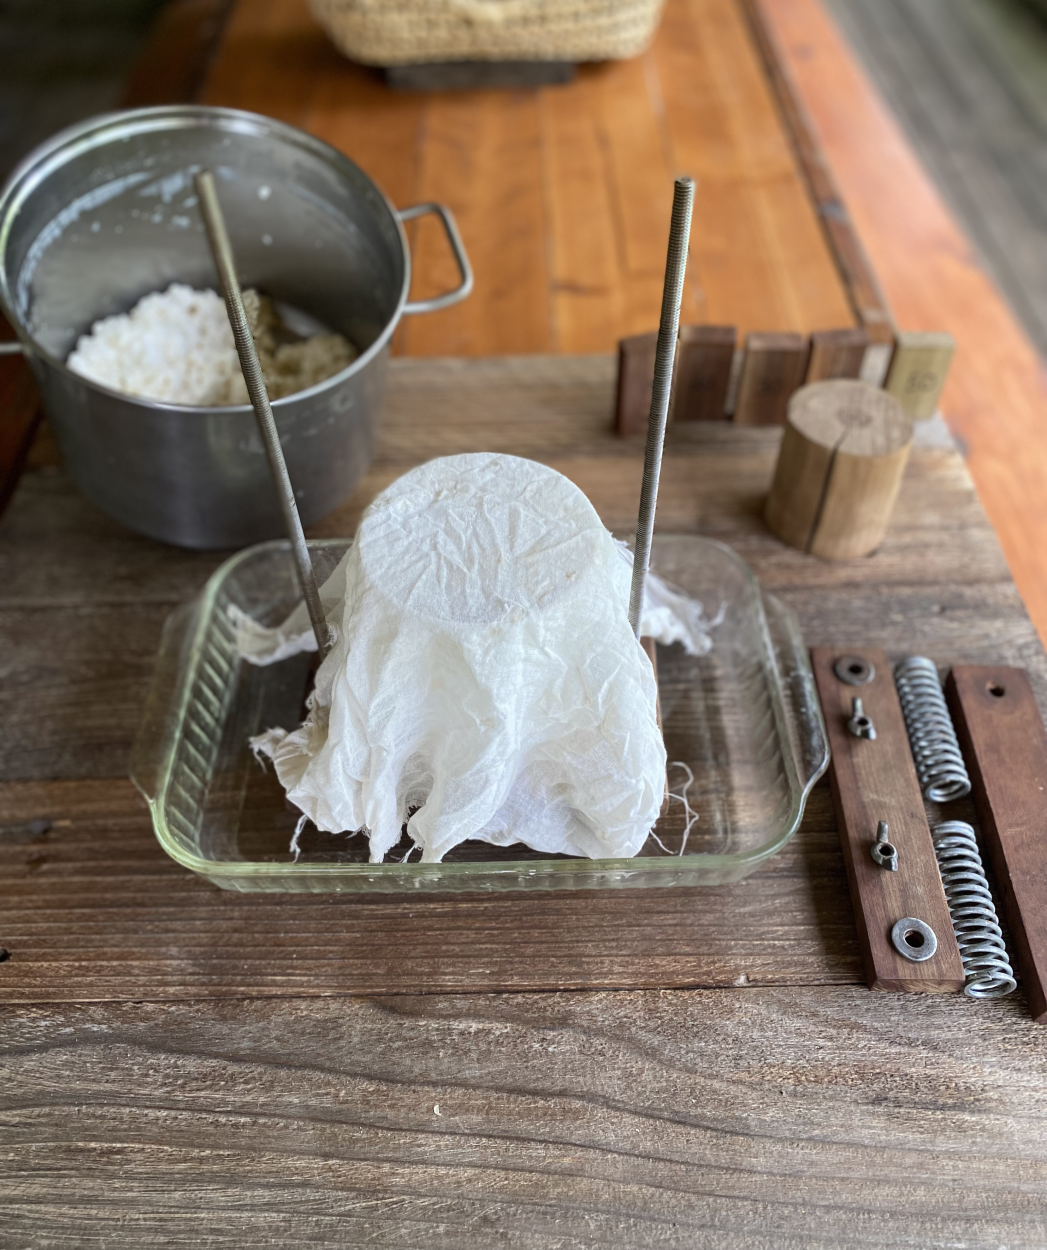
The first two are relatively inexpensive and easy to obtain. The butter muslin can be purchased from New England Cheesemaking Supply Company or you can look online and even find unbleached, organic butter muslin. Butter muslin is simply cheese cloth with a tighter weave, which is much nicer to work with. The cheese cloth you find at Lowes will fall apart and leave strings behind in all your cheeses - bleck!
I highly recommend a Cooper digital thermometer (Amazon.com: Cooper Atkins-DFP450W Digital Pocket Thermometer, 4-5/8 in. L,multicolor : Home & Kitchen). After getting unreliable results from multiple $10 and $12 models, I upgraded to this slightly more expensive thermometer and have now used it exclusively for years. I have even had several analog thermometers fail me, which surprised me. Temperature is so important in cheese making, you'll want to spend the extra $10 to get a good thermometer!
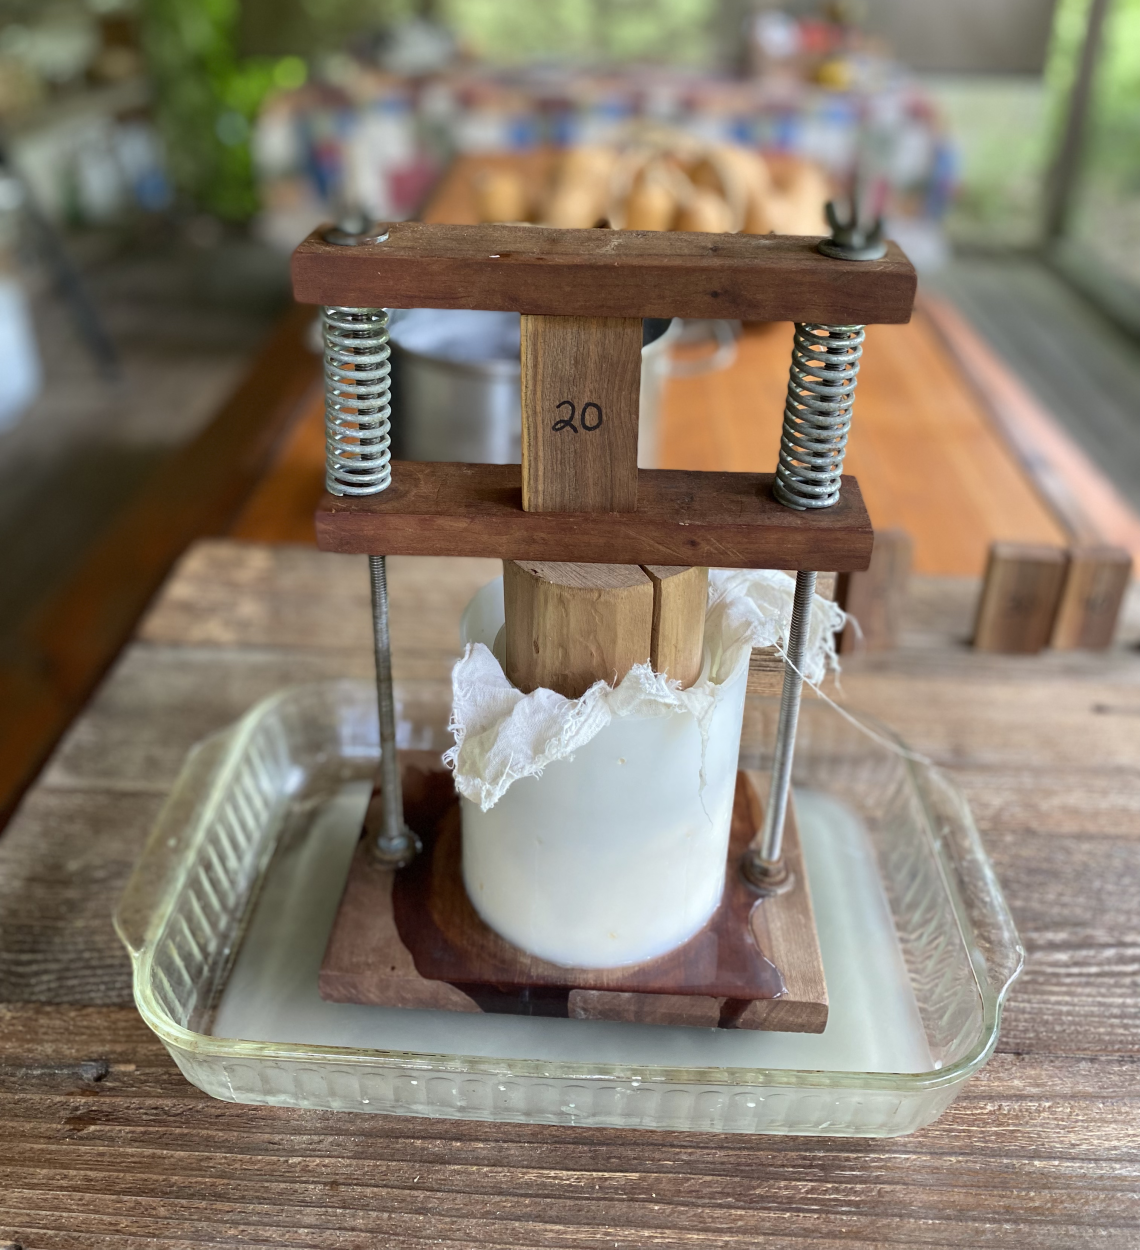
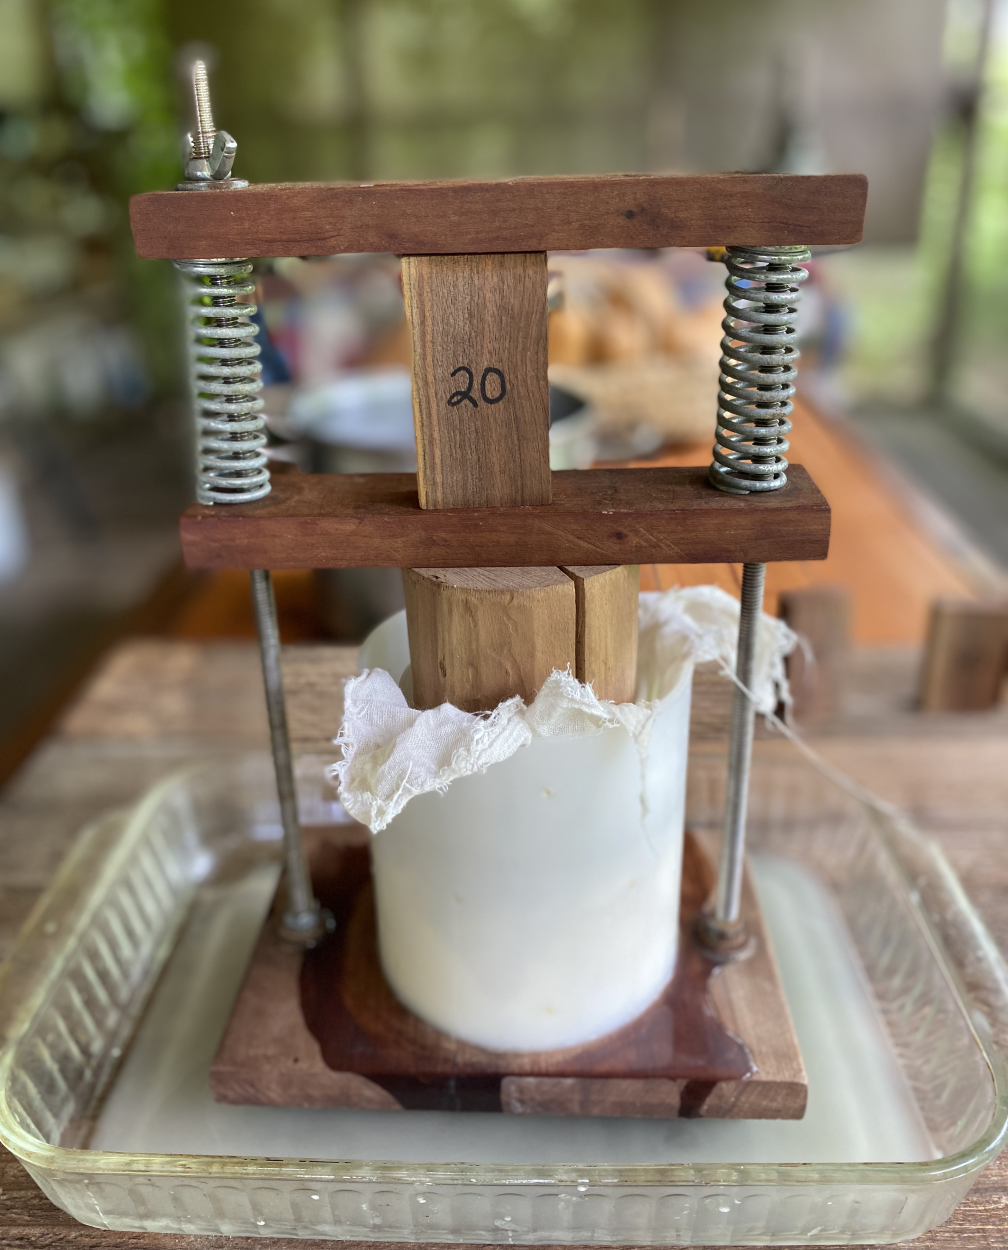
You can purchase a cheese press for around $200 or try your hand at making one! If you're handy and up for the challenge, a home-made cheese press is a much less expensive option!
There are decent directions here. This is basically what my husband used when making our first press. We determined the pressure by placing weights on top and measuring the spring compression that way. I started measuring with a ruler but have since made different size wood blocks to use as spacers for each weight increment that I use.
Before investing time and money, you might see if you can borrow one, or try propping weights (if you have some) for your first cheese. Cheese making takes time and isn't for everyone. It would be unfortunate to discover that cheesemaking isn't your jam after you purchase a cheese press!
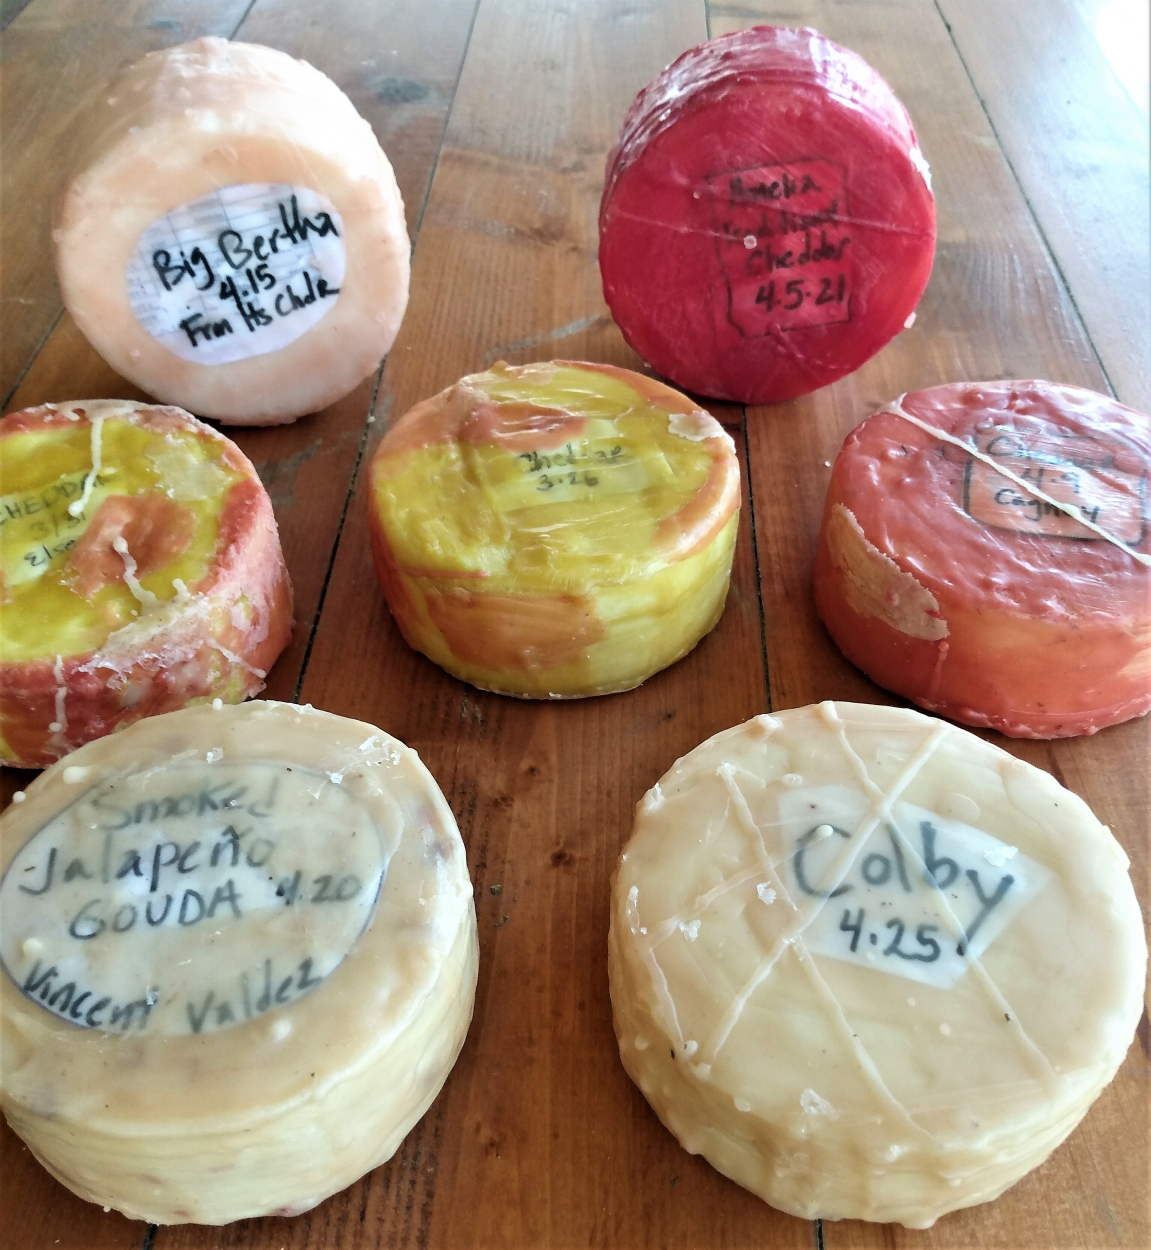
A true cheese cave is a rare and wonderful thing. If you have an actual cave on your property, consider yourself lucky! An ideal aging environment is one that maintains a constant temperature around 55-degrees, and ideally 85-90% humidity. If you have a basement that falls in the temperature range for months at a time, you can create humid conditions with bowls of water. If not, your best bet is to do like I did, and converting a mini-fridge into a cheese "cave". This is very simple with an external thermostat, but the cost for the thermostat alone is around $100! If you know of someone who has done this near you, you might be able to rent space in their homemade cheese cave...
Alternatively, I have a good friend who has aged cheese in a cooler by diligently replacing an ice pack every day. She is successful at maintaining the internal temperature of her cooler at an acceptable range.
A refrigerator is too cold for aging cheese. You want a habitat that will promote the slow activity of the bacteria (introduced in the starter culture) in the cheese to do their work. This slow aging is vital for good cheese, much like good wine. The bacteria should ultimately produce enough acidity to preserve the final cheese. A refrigerator is too cold for proper acid development and therefore flavor. You may get away with keeping cheese between 55-60 or even 65 degrees. Maybe...
Again, the New England Cheese Supply Company is a great resource for all of your home cheese making supplies. I use either the basic mesophillic cheese starter (C101) or Flora Danica for most of my cheeses. I also buy rennet online here. The other key ingredient is kosher salt, which can be found at any major grocery store.
As for the milk, you will need to find raw or pasteurized milk. This has become very difficult in the past 10 years. As non-dairy milks such as almond, oat, rice, and soy milks take up more of the shelf space inthe dairy case, cow's milk doesn't fly off the shelves as quickly as it used to. In order to save their fannies, milk producers have started ultra-pasteurizing milk, which lengthens the shelf life considerably. The down side is that the protein structure of ultra-pasteurized milk changes so much that it can no longer make an acceptable curd for cheese. I know this is the case with mozzarella. I honestly haven't tried using ultra-pasteurized milk to make hard cheeses, but I hesitate to risk it. The other kicker is that ultra-pasteurized milk is no longer labeled as such!
Finding local fresh milk can be tricky. I probably don't need to tell you to try Googling "fresh milk near me". Another possibility is Raw Milk Finder - Real Milk. I'm not advocating for raw milk. This is a highly contested issue for some people, and I don't want to get into the debate here. I will say two things. Raw milk has greater potential to introduce pathogenic bacteria into the cheese, which could be harmful for human health. On the other hand, raw milk imparts the best flavor and can make some of the yummiest cheese. At the time of this writing, I use raw milk from my four nanny goats, but I can see both sides of this debate! I might change my mind if I get sick someday!
While I have no doubt that Ricki Carroll is a much better cheese maker than I am, I disagree with her advice to start with Farmhouse Cheddar in her book Home Cheese Making. Farmhouse cheddar yields a mealy cheese that could easily turn off beginner cheese makers who might mistakenly think this meh cheese is as good as they can produce. Not so! I find gouda and havarti to yield a far superior cheese, and with no more effort.
Ingredients
2 gallons* whole milk (raw or simply pasteurized; NOT ultrapasteurized - see aboce!)
1 packet direct-set mespohillic starter or 4 ounces prepared mesophilic starter (4 ice cube size chunks - click here to learn about making more starter. I highly recommend doing this first!
1/2 tsp. liquid rennet
1 cup cheese salt (non-iodized or kosher) for brine
cheese wax or food saver bags and machine
* You can make a smaller batch, scaling down the ingredients for one or 1.5 gallons. A 2# block of cheese ages better, but some is better than none, and the difference isn't so great.
Directions
Havarti is very similar to gouda. The biggest differences are 1) salt is added directly to the curd; no brining, and 2) the cheese is pressed lighter for less time.
2 gallons of milk (or 1.5 gallons)
4 mesophilic starter cubes (or 3)
1/2 tsp rennet, diluted in 1/4 cup cold water (or 1/4 tsp + 1/8 tsp)
3 Tbsp non-iodized salt (or 2 Tbsp_
To perpetuate the culture, bring a quart of milk to 72 degrees. Add to a sterilized quart jar. Add 2 oz of frozen culture (or just 1/16th - 1/8th of the packet). Stir well to evenly distribute. Leave to sit for 24 hours at room temperature. Pour the lumpy milk, which is now starter culture, into ice-cube trays. One quart will fill 2 trays. One cube = 1oz. of culture!
Ricky Carroll's book is an exceptional resource for those new at making cheese. It is titled Home Cheese Making and is published by the good people at Storey.
My other favorite cheese maker is Gavin Weber. He has a website, but I prefer to listen to his wonderful Australian accent on his youtube channel, which includes more cheeses than you'll likely want to delve into. He's proficient at making you-tube videos and they are totally worth your watching! I am now a self-declared CURD NERD!
Happy cheese making!

Starting February 15, 2022, we will no longer purchase or eat any food from the grocery store (except salt & baking powder). Instead, we are choosing to experience what it is like to raise and forage for all of our food. This means EVERYTHING: flour, oil, honey, spices, cheese, fruits, nuts - Follow our journey and learn about feeding yourselves