EATING ONLY WHAT WE GROW & FORAGE ×

Solar Dehydrator – for Sun-Drying Foods

Solar Dehydrator – for Sun-Drying Foods

Solar Dehydrator – for Sun-Drying Foods

Drying food can be a fun, simple way to preserve the harvest - if done right.  I've proudly dried a quart of calendula flowers, only to find them moldy months later when I hoped to use them in making a skin salve.  The same has happened with green beans, sadly.  When mishaps occur, the reward from all the work of growing food is lost in a moment and replaced by frustration and disappointment.

In this post, we're going to:


Key Components of Solar Dehydrators

You'll best appreciate these key components if we first review how dehydrating preserves food.

Food spoilage organisms (mold, bacteria, even yeasts) need a certain amount of moisture to live.  By properly drying (and storing) foods, you can ensure they will stay free of mold and bacteria in your pantry.

  • The key to proper drying is air movement.  If you've tried to dry foods on a shady porch on humid summer days, you know that low moisture is also key.  Dry, warm, moving air is the goal.  By allowing the air in a solar dehydrator to heat up and have space to move in, around drying trays, and out is key.  The movement via heating and ventilation combats excess moisture in the air.
  • Temperature:  An ideal range for most foods is between 90-130 degrees F.  Lower than 90, and you run the risk of bacteria or mold growth before the food finishes drying.  Above 130 (esp. over 145), can result in a few problems.  One, food cooks!  Two, you risk case-hardening, whereby the skin of a food dries out first, trapping moisture inside the food.  Last, more vitamin loss ensues.


The Cost-Benefit Sweet Spot

This might just be my pet-peeve, but I don't want to spend thousands of dollars on a tool to preserve $50 worth of food.  A 20-year pay off doesn't make sense, especially if that tool is going to live outdoors in the weather for months and therefore is not likely last 20 years.  Conversely, the minimal investment in cheap tools (or even free tools) doesn't make sense if the tool doesn't do its job properly.  If I ruin food in my free dehydrator, then I've incurred a loss.

That said, a great free dehydrator is parked right outside your home (assuming you have a vehicle).  Your car or truck works great as a dehydrator.  To prevent user-error, be sure to

  1. Park in the sun so the vehicle warms up
  2. Crack the windows to ensure ventilation - more on hotter days
  3. Place the food out of direct sunlight for slower drying with more even temperature.  This is especially true for quick-drying herbs, which can be hung from a string behind the front seats.

Since this free dehydrator works, I honestly don't see $pringing for a more expensive one...

Unless - you dry a lot of food.  A LOT.


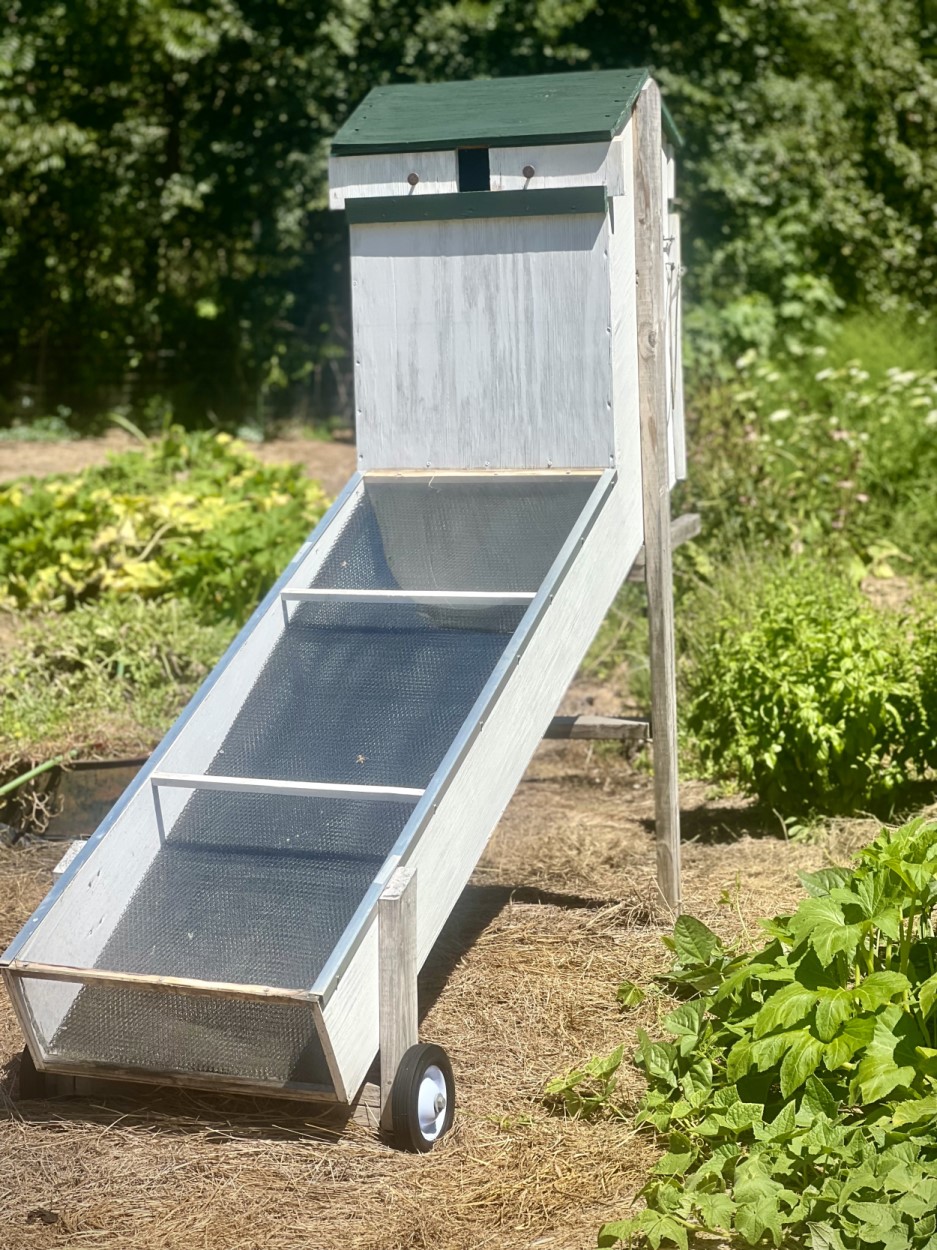
The design we like, by far, the best!

We dry a lot.  From May to November, our dehydrator has food drying inside it on most sunny days.

We have made several different solar dehydrators.  One was basically a table, but instead of a solid wood top, we placed screen and then an additional hinged, openable top of corrugated clear plastic roofing sat above the screen.  This was sealed by the wavy corrugated roof closure strips.  (The roofing material and closure strips can both be bought at Lowes).  The frame of the roof had vent holes drilled in it to allow for air movement.  This sometimes got too hot, and we placed a mesh fabric over the top to reduce the heat radiating inside.

Another dehydrator we build looked a bit like a dresser with 4 drawers and a clear greenhouse panel on top with screen-bottom drawers.

All our other designs worked to some degree, but we have happened upon a design that has lasted us for years and never resulted in a bad outcome.  It hasn't warped, let insects in, got too hot, etc.

solar food dehydrator

What we like about this design:
  • superb air-movement:  Air intake is through a large screen opening at the end of the long-angled segment.  The purpose of this segment is to heat air.  There are 5 sheets of black expanded metal on the bottom of this chamber, which has a plexiglass top.  Air heats up, and as it does, it moves upward into...
  • food-drying trays are out of direct light
  • 11 trays provide 22 square feet of drying space!
  • Temperature stays between 90-130 on sunny days (we have a thermometer inserted through a small hole on the side allowing us to check the temp)
  • Door to drying trays opens to function as a work-table on which you can place food to be dried, or food coming out of the drier.
  • plans are free:  DIY Solar Food Dehydrator Plans – Mother Earth News


Learn more about how it works - watch our youtube short!


Drying Tips

  • set food out in the morning after the dew has dried
  • cut food into small, uniform sizes - the smaller, the quicker food will dry
  • place foods skin-side down when feasable (i.e. tomatoes)
  • cut juicy foods into pieces to prevent case-hardening
  • to blanch or not to blanch:  our reading suggests blanching to slow deterioration of foods by enzymes in the food.  The down-side of blanching is some vitamins, esp. vit C & vit A are destroyed in the high heat.  Our own taste tastes and experimentation with storage duration has led us NOT to blanch our food prior to drying.  The choice is yours.
  • Metal screens can interact with high-acid foods and maybe even transfer scary metals.  But they are sturdy... and cheap...  We cover ours with mesh fabric, like butter muslin, to keep things safe.
  • Butter muslin is also great for catching tiny things like chamomile petals or thyme leaves
  • Some great food-item-specific tips can be found in Rodale's "Stocking Up III: America's Classic... book by Carol Hupping (thriftbooks.com)"  I hope you appreciate the link to a site not tied to Jeff Bezos :)  


Foods to dry and how to use them

dried foods

Pictured is just a small sample of what we dry, and includes:

  • zucchini
  • apple rings
  • blueberries
  • eggplant
  • green beans
  • sundried tomatoes
  • calendula flowers
  • grated carrots
  • garlic (dried and ground into powder)
  • chamomile flowers for tea
  • echinacea flowers
  • chanterelle mushrooms
  • smoked jalapeno peppers - yum!!
  • calendula flowers
  • purple bee balm (better than oregano)

We've also dried carrot coins, red bell pepper slices, onions, other mushrooms, stinging nettle, curly dock, comfrey, raspberry leaf, basil, rosemary, thyme, cutting celery, and more!

What you can dry is limited to your imagination

Using dried foods

We cook stews on the wood stove several times each month during the cold months.  Much like caramelizing imparts a unique flavor to roasted veggies, a stew using mostly dehydrated veggies (for the veggies) has a unique earthy flavor that we enjoy immensely.

  • When rehydrating sun-dried tomatoes, peppers, or mushrooms, place a small amount in a bowl, pour boiling water over, and cover with a lid.  Let steep for 1-20 minutes, then slice the soft tomatoes.  The rehydrated cooking liquid is also delicious.  I add salt to ours, ferment it for a day or two, and keep it in the fridge as a soy-sauce alternative!
  • Grated carrots, grated zucchini, and green beans rehydrate very quickly and are great to take camping to add veggies to dinner meals.
  • Dried greens can also be ground and snuck into many things: smoothies, soup base, homemade seasoning salt, etc.
  • We make road food out of dried apples, jerky, and pecans.  Yum!!
  • The smoked jalapenos (which are technically chipotles!) can be ground and added to anything that needs a splash of smoky flavor: cabbage, roasts, quiche, etc.


I'd love to know how you use your dehydrated goodies.  Shoot us an email with your ideas!